Showing posts with label Dairy-Free Recipes. Show all posts

Delicious Vegan Kale Pesto Recipes

Wednesday 16 April 2014

I love the idea of pesto, but I absolutely cannot approve just how much salt, or oil is poured onto the mixture of commercial products. Some of them have some other strange ingredients added and I wouldn't risk eating such product on a daily basis.
So I came up with an idea that is both healthy, delicious and well-balanced and takes no time to prepare! It is perfect for mixing it up with your pasta, salad or even add less olive oil and use it as a toast topping!
Here are my favorite two varieties:

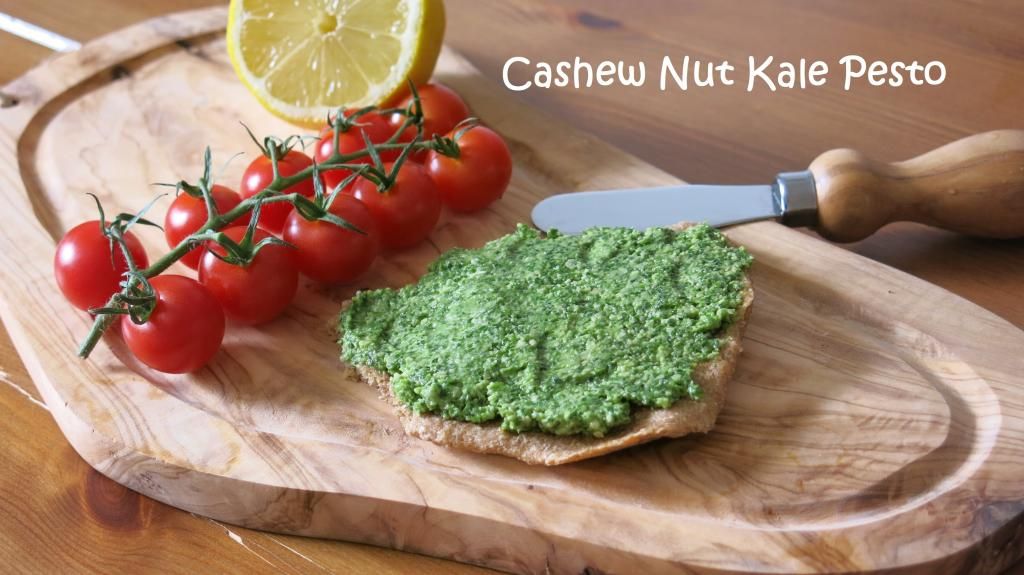
Here's what you'll need for CASHEW based pesto:
♥ Organic Kale - 200g (I just get a large packet and use it all)
♥ Cashew Nuts that are raw, unsalted, non-roasted and preferably organic - 90-100g (or less if you like!)
♥ Organic Virgin Olive Oil - 2-3 table spoons. You can definitely play around with it and use little less if you want to make a spread for toast.
♥ Fresh Basil leaves - I use about a half from the whole living basil pot I buy from supermarket (wish I had a garden to grow my own basil! sigh... :) )
Freshly squeezed juice from either a half or quarter of fresh lemon
♥ Sea Salt - half a table spoon
♥ Ground Black Pepper - to taste

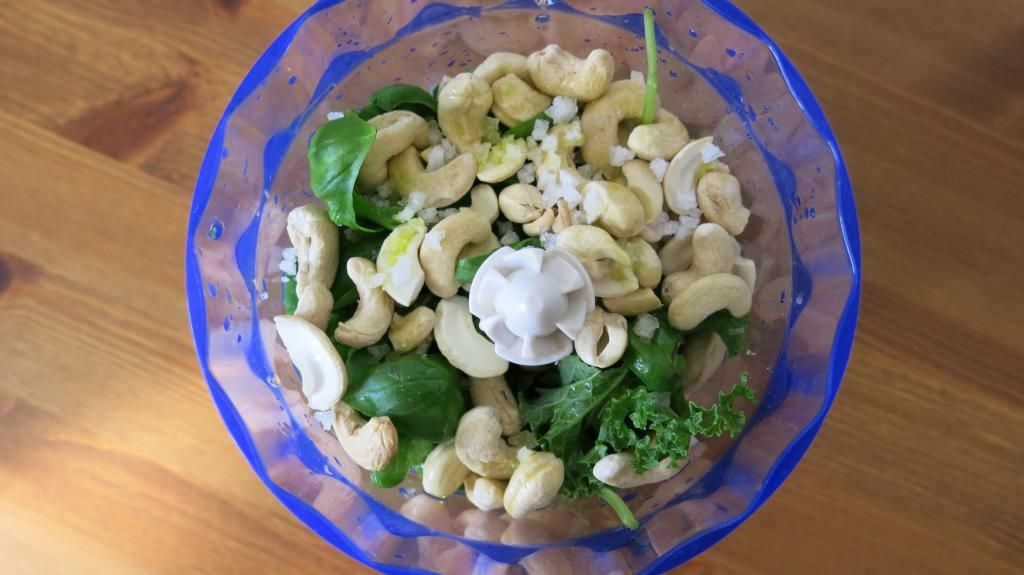
After you washed all leaves and kale, put all ingredients in a chopper or a food processor, and chop until the desired smoothness. If little more moisture needed just add lemon juice or water! ;)

And Voilá!
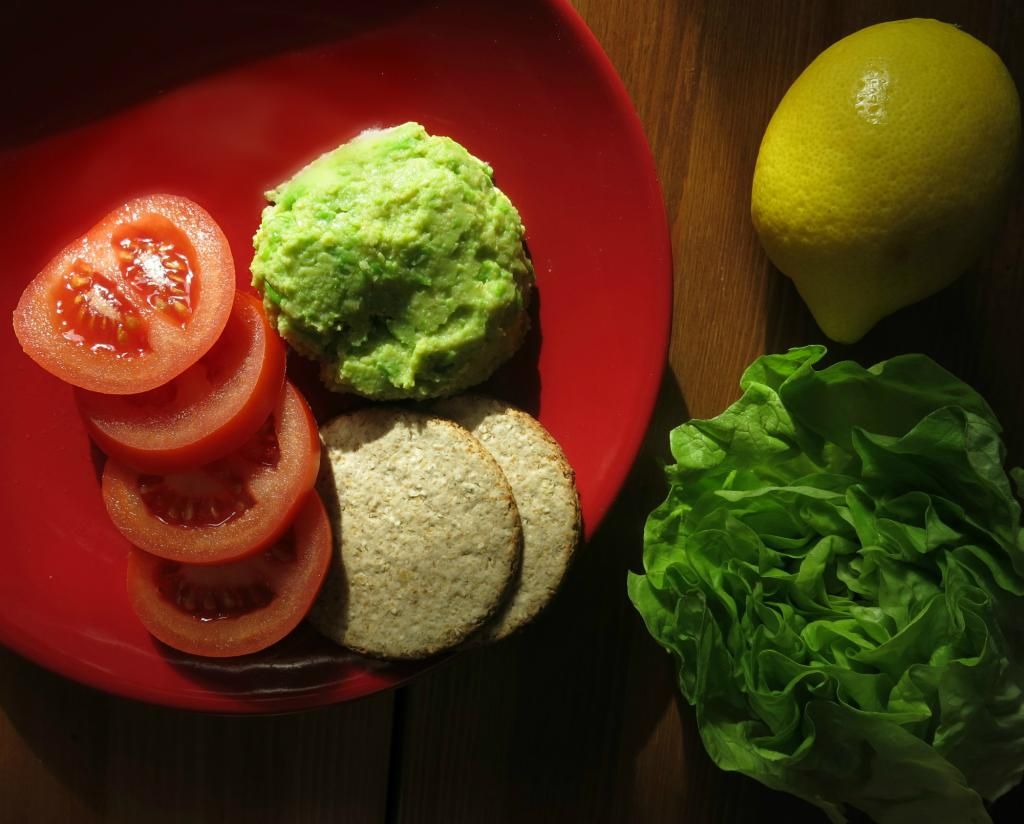
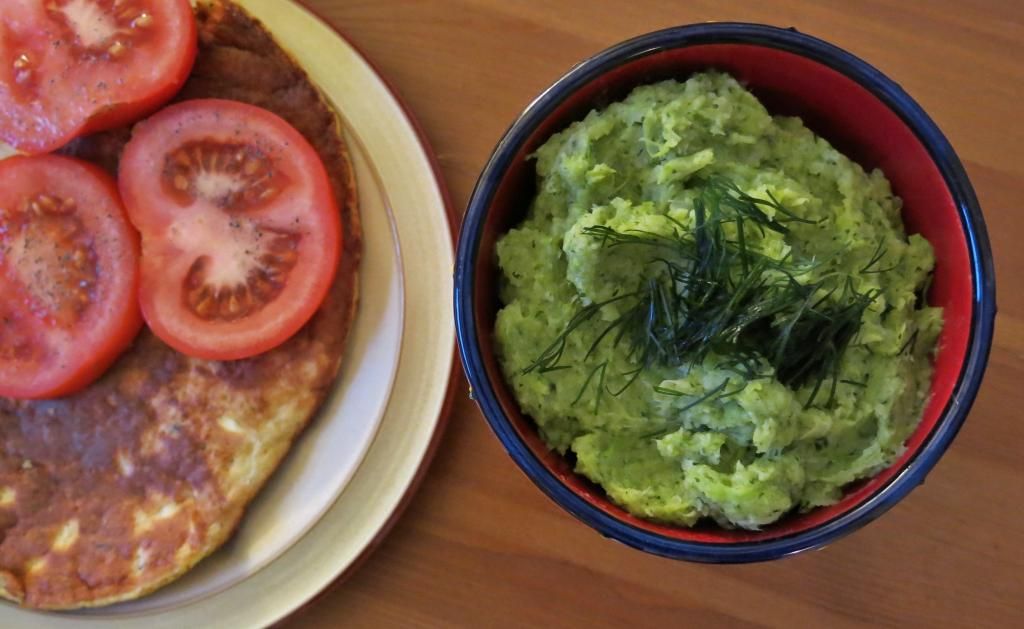
Serve with wholemeal organic pasta (cooked al dente), wholemeal pitta bread or a salad. 

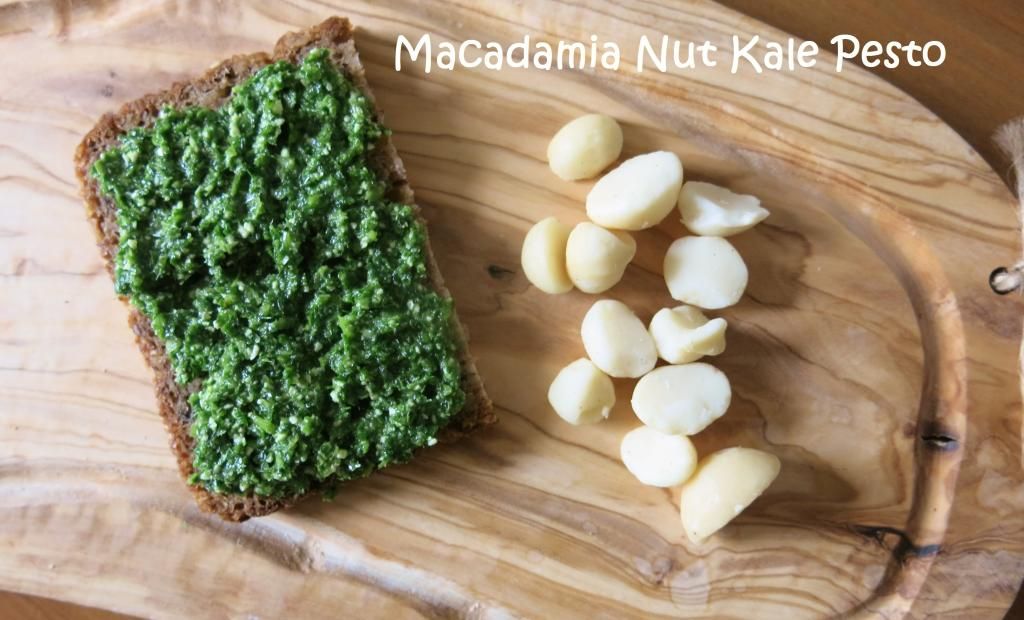
And for MACADAMIA based pesto everything is the same BUT FOR:
♥ Macadamia Nuts that are raw and unsalted - 90-100g or less if you like
♥ Freshly squeezed juice from half a Lime instead of Lemon
♥ I also like to add some fresh dill to the mixture - just a few grams will suffice

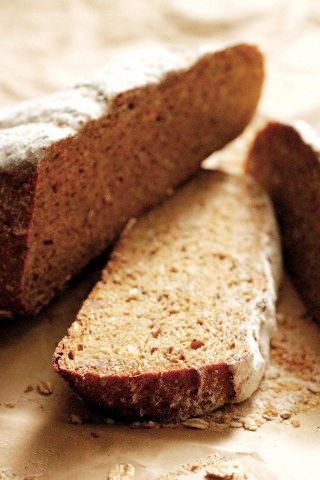
Perfect with organic German rye bread... ❤

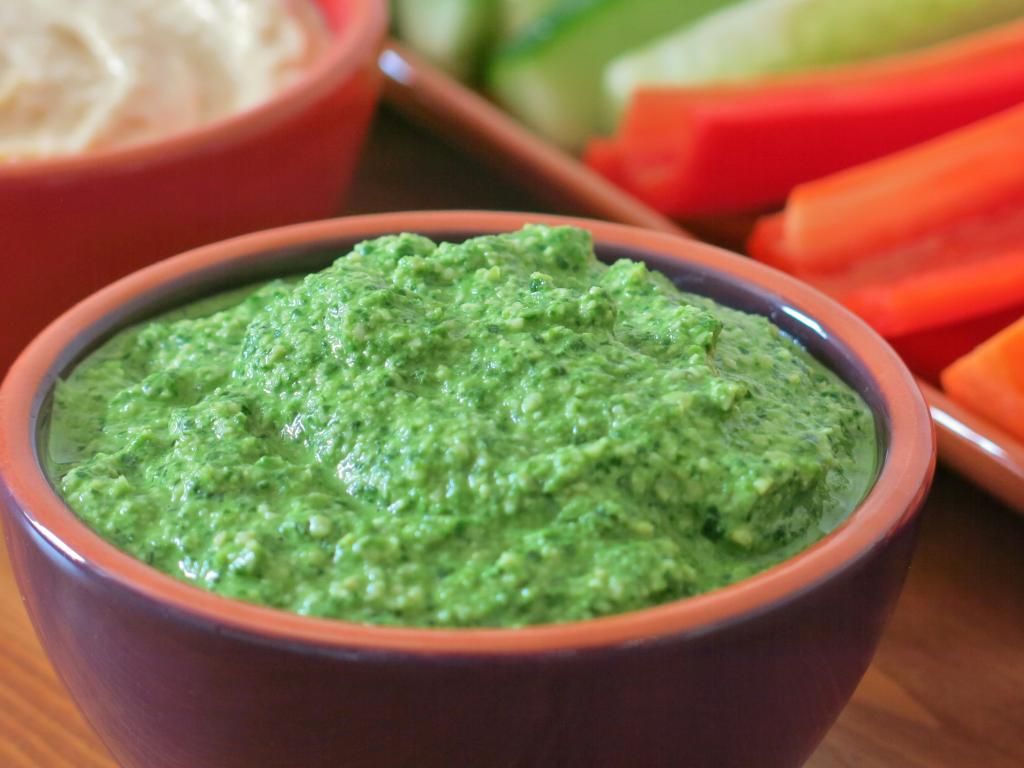
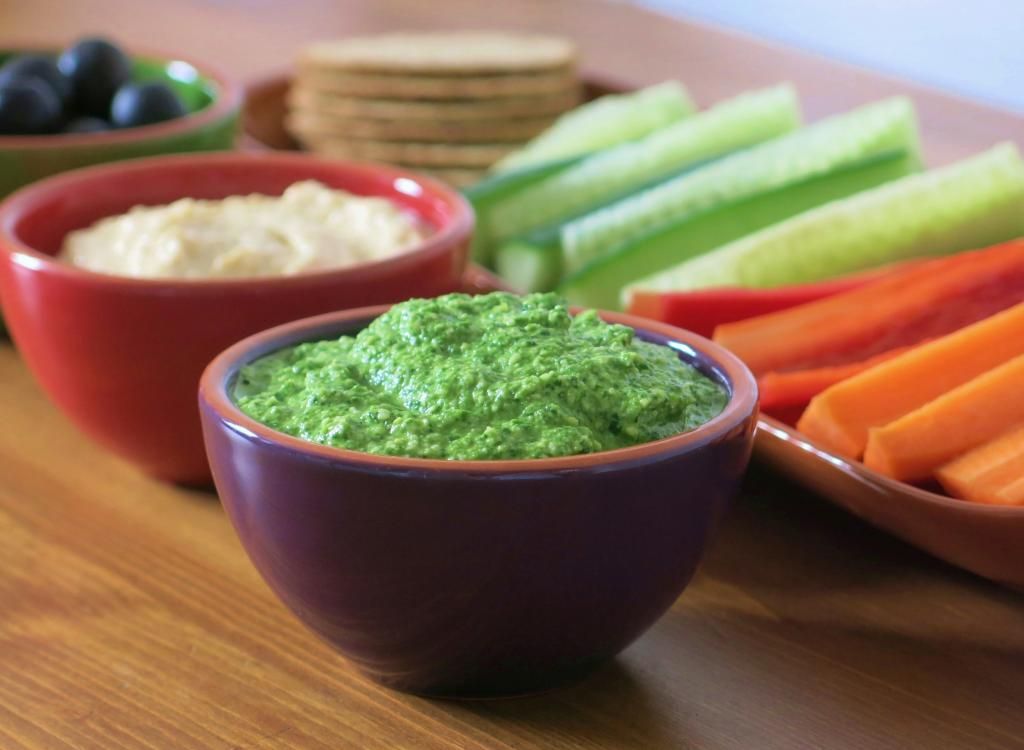
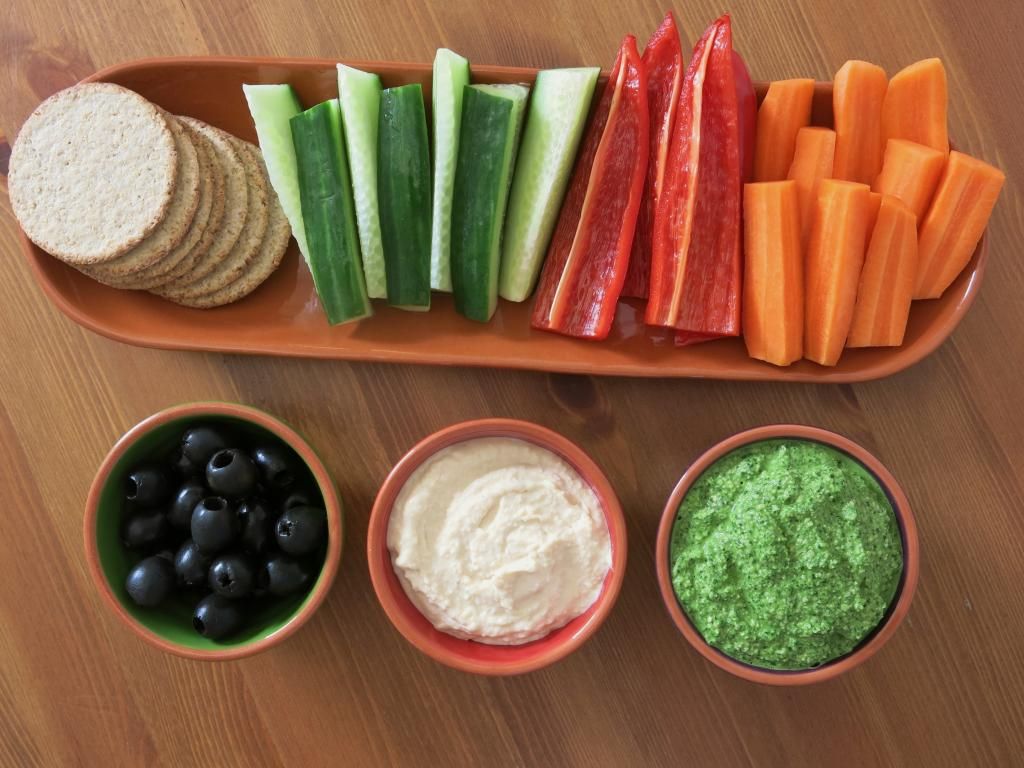
A DELICIOUS DIP VERSION:

This one is actually a raw organic spinach based dip (which again can be perfectly made of kale, so it's entirely up to you!:)) with cashew nuts, lemon juice and sea salt. For this variation just add slightly less olive oil and voila!


Enjoy your food and be healthy!
With Love,
Natalia xx

Delicious Low-Fat Cheese Cake [wheat-free and refined sugar-free!]

Friday 21 March 2014

This light baked cheesecake has won a golden medal in my family! Being low fat yet nutritious and filling, not too sweet and not too sour, having soft texture and delicious flavors - all of that makes it a perfect breakfast idea. It is a safe dessert alternative for those who watch their weight, follow a low-sodium diet, healing a stomach from gastritis, have irritated stomach lining or other abdominal distress. And kids love this cake too!


I am happy to say straight away that preparation is very easy and no advanced or even intermediate baking skills are required!

INGREDIENTS:
♥ 500g of low fat cottage cheese or quark
♥ 4-5 large ripe bananas (4 for a thinner filling as on the second picture above)
♥ 130g of rolled oats
♥ Optional: 2-3 tablespoons of sugar-free low-salt peanut butter or cashew nut butter
♥ Optional: 1/2 tablespoon of vanilla powder
♥ Coconut butter to smear a baking tin

METHOD:
♥ Preheat an oven to 180C degrees.
♥ Very lightly smear the inside of your pie tin with a thin coating of organic butter or coconut butter (no margarine)

Cake base:
♥ Take a standard coffee mug of steel-cut or rolled oats (not 'easy-cook' or instant oats)
♥ 2 large ripe bananas
♥ Optional: If you don't suffer from nut allergies and if you are not prone to migraines - 2-3 tablespoons of organic sugar-free low-salt peanut butter. If you add peanut butter, you can safely reduce the amount of butter or coconut butter you smeared your pie tin with
♥ Process the base mixture in a chopper or anything else that does the same job - chopping and blending everything well together :) Any food processor will do! Here's a picture of the one that I use and it came within a hand blender set. By the way, it's better to process ingredients in parts if they don't all fit into your food processor's container at one time.
Hello, I'm a chopper! :)
♥ Now line the bottom of a pie tin with the base mixture ans smooth it out with the back side of a tablespoon. Bake it for 12 minutes.
♥ Clean the chopper or food processor's container as you'll need it again to make the filling.
♥ After 12 minutes have passed, take the cake base out from the oven and let it cool down a little. It need not be too soft of too crusty, just somewhere in between is perfect!

Cake filling:
♥ Take approx. 500 g of low fat organic cottage cheese
♥ 3 large ripe bananas (or 2 for a thinner filling, see 2nd picture from the top)
♥ Optional: 1/2 tablespoon of vanilla powder (if you can get it organic - that's great!)
♥ Blend it all together in a food processor. I just use my good old chopper you now are introduced with. :) In the UK cottage cheese usually comes a bit watery and grainy, so if you are using a dry/drained cottage cheese, you might want to add some water (about 7 tablespoons) or organic plain yoghurt or kefir, so that a consistency or your mixture resembles a pudding.

Raw mixture before cooking: 

♥ Pour the mixture over your base and bake for 30 - 35 minutes at 180C degrees.
♥ Take it out, let it cool until room temperature and then unclip the sides of your pie tin to serve.

You can also do a layered version with blueberries.❤


1. Bake your oats & banana cake base (instructions as above) for 10 minutes.
2. In a food processor or chopper process 140g of frozen or fresh blueberries with 80g of cashew nuts. The consistency should not be too watery, but should look rather like a thick yogurt. Pour the mixture over the base and bake it for another 20 minutes.
3. Follow the instructions above on how to make a cake filling and pour it over the blueberry layer. Bake for another 30-35 minutes. Let cool and enjoy! 

 Bon Appétit!

Perfect Morning Wake-Up Smoothie! Hello Sunshine, Au Revoir Coffee!

Sunday 16 March 2014

Some of you may know that I am not a fan of cleansing diets or strict detox regimes as these can cause great complications on your health an put your body under unnecessary stress. So instead I suggest a mild and natural way that purifies your blood, strengthens your liver and promotes healthy digestion - nourishing smoothies and fresh vegetables salads high in fibre vitamins and minerals.
I want to share with you several recipes that me and my family love, so that you can pick and chose which ones you like best.  ❤   

Why it is good for you:
I love this morning smoothie for its waking-up, hydrating, invigorating and refreshing properties! It does it job so well, you'll forget about your morning coffee. ;)
      ♥ It strengthens your stomach lining and cleanses your digestive tract too.
      ♥ It is also perfect if you have a sore throat and it greatly boosts your immunity to keep those colds and flu away!
      ♥ This smoothie does not spike your sugar level (therefore doesn't make you tired or sleepy!), but at the same time being rich in fibre, vitamin C and beta-carotene (when adding carrots), water and potassium it kick starts all processes in your body to get you ready for the day!

Ingredients:
      ♥ 1/2 large green apple
      ♥ 1 tablespoon of fresh peeled ginger
      ♥ Optional: 1 heaped tablespoon of kale
      ♥ Either half a pear or 1 kiwi or few slices of any citrus fruit or any berries of your choice -  Whatever your heart desires on that particular day! :) If you suffer from stomach problems, add a half of a medium size banana.
      ♥ Filtered water to fill in your glass in between the fruit pieces
      ♥ Blend everything in your smoothie / milkshake maker for about 10-15 seconds. Shake well and enjoy!

Or a second option:
Another variation of this smoothie is to add carrots and kiwi. 
When you add carrots, slice them into small bits so that the blades of your drinks maker can go through them easier. ;)
 
As always remember - add citrus fruit if your stomach can tolerate them, otherwise if you have a sensitive stomach - add half of a medium size banana. ;)

With Love,
Natalia xx

Easy Vegan Cream of Mushroom Soup

Sunday 2 February 2014

Another perfect warming soup - easy and quick to prepare, incredibly creamy and delicious... Here's to your good health and slim waistline!
Loving the soup season!


WHAT YOU NEED:

♥ 1 medium head of cauliflower
♥ 1 medium white onion
♥ 250g of white mushrooms
♥ approx. 480 g of unsweetened almond drink
♥ 1 tablespoon of extra-virgin olive oil
♥ Sea salt and ground black pepper to taste
♥ 1/2 tablespoon of dried thyme
♥ 1/2 tablespoon of dried basil

OPTIONAL:

♥ 3-4 minced cloves of garlic
♥ Any other herbs and spices to taste - parsley, nutmeg, oregano, coriander or mint

SERVE WITH:

♥ Spoonful of sunflower of pumpkin seeds
♥ Fresh dill
♥ Wholegrain oatcakes or wholemeal bread with bran (Ezekiel is great too)
♥ IF YOU ARE NOT VEGAN OR VEGETARIAN - Serve with grilled chicken fillet ;)

Choose as many organic ingredients as possible.

DIRECTIONS:

1. Put cauliflower florets into a saucepan with unsweetened almond drink. Add pepper, cover with a lid, and boil for 5-7 minutes over medium heat.


2. In the meantime, put diced onion and mushrooms onto a frying pan and stir fry in a little amount of olive oil for about 5 minutes until onion and mushroom begin to change it colour into golden and become softer. Stir them regularly.


3. Transfer onions and mushrooms into a saucepan with cauliflower. Take a hand blender and puree the ingredients until smooth. (Helpful Tip: To avoid spills always keep the blender below the liquid level. As a safety net, keep your hand palm down on top of the saucepan.)

4. Add the remaining spices and herbs, and simmer for 8 minutes until thickened.


❤ BENEFITS:

Fibre, vitamin C, vitamin K, thiamin (vitamin B1), riboflavin (vitamin B2), niacin (vitamin B3), pantothenic acid (vitamin B5), vitamin B6, folate (vitamin B9), vitamin D, manganese, potassium, phosphorus, copper, selenium and even some protein.

Sunflower seeds also contribute with monounsaturated and polyunsaturated fats, non-heme iron, magnesium, zinc, sulphur and vitamin E.

Be healthy and enjoy losing weight in a delicious way!

With Love,
Natalia xx

Vegan Cream of Broccoli Soup with Cannellini Beans

Saturday 1 February 2014

Here's a cream soup recipe to warm you up and boost your immunity and vitality! Takes no time and is super delicious!


WHAT YOU NEED:
♥ 1 bunch of broccoli
♥ 1 large white onion or 1/2 leek
♥ 300-350g of Canellini beans (alternatively, butter beans will do as well)
♥ 500ml of boiled water
♥ 2 bay leaves
♥ 1/4 teaspoon ground pepper
♥ Sea salt and ground black pepper to taste

OPTIONAL INGREDIENTS:
♥ 3-4 cloves of garlic
♥ nutmeg or majoram
♥ thyme
♥ 30g of peanuts or cashew nuts
♥ fresh or frozen dill to serve (pictured)
 Choose as many organic ingredients as possible.


PREPARATION:
1. Soak dry beans in a filtered water overnight. Drain and rinse. Add filtered water and bay leaves and boil for 1 - 1 1/4 hours in amount of water twice the volume of beans. Scoop of any foam. The longer you soak beans, the shorter the cooking time. Once beans are ready, take out the bay leaves, but don't drain the beans. Just cover them with a lid until other ingredients are ready.

* If you're short of time - use cannellini beans that are already prepared. Some grocery shops sell organic ones. ;) 

2. In the meantime, put broccoli florets into a frying pan, add a 4 tablespoons of filtered water, cover with a lid and leave for 5 minutes until slightly tender.

3. Put chopped onion/leeks onto another  a frying pan and stir fry in a little amount of olive oil until just slightly golden. 

4. Now transfer broccoli and onion/leeks into a saucepan with cannelloni beans. 

5. Take a hand blender and puree everything carefully until smooth. 

6. Add herbs and pepper to taste.

7. Simmer for 5-7 minutes.

8. Enjoy with organic wholemeal toast, wholegrain oatcakes, or lean protein products.

*** serve with 30g of stilton cheese if you are lacto or lacto-ovo-vegetarian.


❤ BENEFITS:
Calcium, non-heme iron, potassium, phosphorus, magnesium, manganese, selenium, zinc, β-carotene, vitamin C, riboflavin, vitamin B6, folate (vitamin B9), vitamin K, fibre, protein. This mighty soup has anti-oxidant, anti-aging, detoxing as well as flu/cold and cancer fighting properties. And of course - it promotes healthy weight loss!


With Love,
Natalia xx

Homemade Hummus with Garden Peas

Monday 27 January 2014

Bored of your ordinary hummus? Try this simple delicious makeover by adding garden peas to your standard hummus ingredients.
 

PREPARATION:
♥ Soak dry chickpeas in a filtered water overnight. Boil for 40 minutes - 1 hour in amount of water twice the volume of chickpeas. The longer you soak chickpeas, the shorter the cooking time. Drain chickpeas and let them cool down.
♥ Put frozen garden peas into a big mug and leave them in the fridge overnight (OR add warm (not hot!) filtered water for about 15 minutes and then drain).
♥ Mix cooked chickpeas with green peas in 1:1 or 1:2 proportion (depends on your preference)
I took about 200g of garden peas and 300g of chickpeas to share hummus with a family.
♥ Add two tablespoons of extra virgin olive oil. Blend everything together in a blender. As you are blending ingredients, add filtered water by tablespoons as often as necessary to make blending easier. The longer you blend, the smoother is the hummus. I prefer it semi-smooth :)
♥ Add a little bit of salt (not more than 1 tablespoon as hummus is already very flavorsome) and a quarter of teapoon of black pepper. All done!

OPTIONAL:

♥ 1-2 garlic cloves
♥ 1/2 - 1 tablespoon of fresh lemon juice
♥ 3-4 tablespoons of tahini or almond nut butter
♥ 1 teaspoon of caraway seeds

SERVE WITH:
        ♥ Wholemeal bread and organic
        ♥ Wholegrain oatcakes or crispbread
                           AND
        ♥ Sliced raw vegetables like tomatoes, cucumbers, carrots, lettuce or any other raw vegetables you like.

❤ BENEFITS:

Healthy and easy dip idea for a whole family! Great for any time of the day and any occasion. You can even take it with your for lunch to work in a small clip lock box. It is also perfect for everyone who wants to lose weight, promote digestive wellness and lower cholesterol!
 
Such hummus is rich in protein, fibre, beta-carotene, thiamin (vitamin B1), vitamin C, vitamin K, folate (vitamin B9), niacin (vitamin B3), none-heme iron, magnesium, manganese, zinc, phosphorus, selenium and potassium. It is also a source of riboflavin, vitamin B6, pantothenic acid (vitamin B5), vitamin E and monounsaturated fats.

Easy breakfast or snack for kids (or for yourself) in 5 minutes - Warm Fruit Sandwiches

Friday 24 January 2014

If your kids love fruit or if you feel like heaving a light breakfast, and you are short of time - this option is for you!

BENEFITS:
♥ Plenty of dietary fibre and complex carbohydrates that
  • help feel full longer
  • increase physical stamina
  • promote mental alertness
  • help with weight control*
  • keep gastrointestinal tract clean.
♥ Potassium for vitality, optimal water balance and functioning of organs and muscles. Speeds up all processes in the body.
♥ Magnesium for formation of bones, teeth and proper functioning of nervous and muscular systems. It promotes good mood and healthy metabolism.
♥ Calcium and Phosphorus for healthy growth in children, strong teeth and bones, proper muscle contraction and nerve signals transmission, optimal fat metabolism and healthy weight control.
♥ Manganese for formation of bones, skin (collagen formation), healthy metabolism and immunity.
♥ Chromium for healthy sugar level control in blood.
♥ Vitamin B6  for good mood (helps produce serotonin), immunity and healthy metabolism and healthy heart.
♥ Vitamin C for healthy growth, tissue repair, stamina and it fights again free-radicals and infections.
♥ Easy and quick to prepare
    ♥ Delicious - your kids WILL love it!

PREPARATION:
    ♥ Wholegrain bread (preferably with bran) from integral/wholemeal flour) something like this:
If you can get organic bread - fantastic!
Sprouted bread is particularly beneficial (e.g. Essene/Ezekiel bread).
     
     ♥ Slice organic apple and banana
     ♥ Put sandwich on top (not inside) of toaster to serve warm sandwiches :)
     Sprinkle cinnamon on top of apples for a delicious flavour!
  
SERVE WITH:
Glass of warm organic semi-skimmed milk for kids to maintain healthy growth
Warm almond drink or oat drink if your kid is lactose intolerant (preferably unsweetened)
Small pot of organic low-fat plain yogurt 
♥ Vegan option: Spoonful of organic sugar-free low-salt peanut butter or almond butter
You can also alternate between wholemeal bread and organic wholegrain oatcakes (wheat-free).
*Skip the banana if you are trying to lose weight. Bananas are OK though in moderate quantities if you are maintaining your weight.

Enjoy!
Love,
Natalia xx 

Healthy Winter Warmer: Broad Beans, Cauliflower and Broccoli Mash Recipe

Tuesday 7 January 2014

In this cold weather the last thing you want is a cold meal that chills you even more!
Here's what I suggest as a warming meal - a finger-licking green bean, cauliflower and broccoli mash.


It's very easy and quick to prepare, very kind to your stomach and soothes it's lining (which is especially important for those who suffer from gastritis or heartburn or consumes foods that irritate stomach lining, e.g. vinegar, citrus fruit, tomatoes and all tomato based sauces, coffee or spices like chilli or curry).

It is high in fibre, beta-carotene, vitamin B6, vitamin C, vitamin E, vitamin K, vitamin U, pantothenic acid, folate, riboflavin, potassium, manganese, phosphorus, magnesium, iron and calcium. And of course it won't make you put on any pounds as it right on the contrary promotes a healthy weight loss.

How's that for a health boosting potion that makes your waistline smaller! Potato mash is clearly lagging behind!

INGREDIENTS:
♥ 300g lightly steamed cauliflower
♥ 300g lightly steamed broccoli
♥ 300g baby broad beans (also known as fava beans, bell beans, field bean or tic bean
♥ 1 medium trimmed leek
♥ Fresh spring onions or chives
♥ 1/2 tsp organic virgin olive oil
♥ Sea salt
♥ Optional: 1-2 cloves of garlic

DIRECTIONS:
1. Defrost broad beans for 3 hours at room temperature of overnight.
2. Lightly stir fry chopped leek in a little amount of olive oil.
2. At the same time put cauliflower and broccoli into a saucepan and add around 150 ml of filtered water. Cover with a lid and let the steam soften the vegetables for around 4 minutes. After this time, add broad beans on top and leave covered with a lid for another 4 minutes on medium heat.
3. Add garlic and leak and blend everything together until smooth.
4. Add just a little sea salt and mix the mash with a wooden spoon.
5. Serve with freshly chopped chives, spring onions or dill.

If you want to have the mash warmed up - just put it into a microwave for 2 minutes or in a pan with a couple of tablespoons of warm water.

Enjoy!

Love,
Natalia xx

Homemade Organic Fermented Milk Drink

Friday 22 November 2013


I'd like to share a very simple recipe of a very popular fermented milk drink in Russia and all former Soviet Union states ! It is very similar to yoghurt, but is much better for drinking.

There are loads of production ways, but I want to share a very easy way of how to do it at home!

1. Bring to boil organic semi-skimmed milk. Cool it down. Pour it into any glass container.

2. Take a small piece of organic dark german wholegrain rye bread (like a Schneider Brot / German Vollkornbrot) and put it into the milk. For 1 pint of milk you'll need a bread slice only 4х4 cm big.

3. Close the container or cover with a saucer. Leave to stand for 1,5 or to days.

4. Enjoy with fresh cucumbers seasoned with dill and rye bread! It is suitable for any part of the day and your kids will love it too.

Bon appétit!
Natalia xx

In Russian / По-русски:
 
Всем любителям простокваши посвящается!
Если вам в Англии тоже сложно найти кефир или простоквашу по душе, вам очень понравится такой способ! Вам не понадобятся специальная грибковая закваска, которую используют для приготовления кефира. Зато такая простокваша домашнего приготовления совсем не уступает по вкусу настоящему кефиру!

1. Берем натуральное Organic Semi-Skimmed Milk (полуобезжиренное), доводим до кипения. Снимаем с огня и остужаем. Когда молоко стало хотя бы комнатной температуры, разливаем его с стеклянную баночку.

2. Чтобы молоко прокисло, добавляем в него маленький кусочек черного хлеба (примерно 4х4 см на 560 мл / 1 пинту), обязательно корочку. Я брала Organic German Wholegrain Rye Bread - плоский Schneider Brot / German Vollkornbrot. Можно добавить ложку Organic Probiotic Yoghurt для более "кремовой" текстуры.

3. Закрыть баночки и на 1.5-2 дня поставить на подоконник. И ГОТОВО!

Для последующего приготовления хлеб уже не понадобится - достаточно будет добавить в кипяченое и остуженное молоко две-три ложки уже готового напитка.
 
Только вот весь свой я уже выпила - очень уж соскучилась по кефиру с огурцами!! :)

Всем приятного аппетита! 
Наталия хх

Simple Vegan Banana & Oat Cookies [High-Fibre, Low-Fat, Wheat-Free, Refined Sugar-Free]

Thursday 21 November 2013


Great as a morning nibble for you and your little angels (i.e. your kids! :))) )


INGREDIENTS: 
♥ 2 medium ripe bananas
1 mug of oats
♥ Dried fruit and seeds to taste
♥ Organic ground cinnamon or ground vanilla powder 
Organic coconut butter to brush the pan you'll be cooking with

DIRECTIONS:
STEP 1: Preheat the oven to 190C.
STEP 2: Puree bananas with a hand blender or chopper. Add dried fruit of your choice and blend lightly. Chopping dried fruit with a knife works just as well!
STEP 3: Stir in oats, seeds and either ground cinnamon or vanilla powder and mix everything well.
STEP 4: Grease your baking tray with coconut butter. Then using a tablespoon and your clean hands, form little flat cookies and put them one by one onto the baking tray.  Turn down the oven temperature to 180C and bake for 12 minutes.
STEP 5: Let them cool down on a plate and ENJOY!

And here's a picture of my favorite version made of dried figs and desiccated coconut:


With love,
Natalia xx